Introduction
In this post, we’ll look at how to use the L298N motor driver module with a Raspberry Pi to control a DC motor. The Raspberry Pi is a versatile single-board computer that allows us to interact with a variety of electronic components and build intriguing projects. We can simply control the speed and direction of a DC motor by combining the power of the Raspberry Pi and the capability of the L298N module. We will go over the necessary components, and wire connections, and provide step-by-step instructions for setting up and controlling the motor.
What is Raspberry Pi?
The Raspberry Pi is a single-board computer that is the size of a credit card, is compact, and is reasonably priced. It was developed with the intention of advancing computer science education and giving users a free or low-cost space to learn on, play with, and develop projects. Due to the Raspberry Pi’s adaptability, simplicity of use, and wide range of applications, it has become extremely popular among enthusiasts, hobbyists, educators, and professionals.
A system-on-a-chip (SoC) containing a processor, memory, input/output (I/O) ports, and several other components is what makes up the Raspberry Pi board. A Linux-based operating system, like Raspbian, which was created especially for the Raspberry Pi, is normally what it runs.
The Raspberry Pi has a wide range of features and applications, including the following:
Education: The Raspberry Pi has been widely used as a teaching tool in schools and other learning facilities for computer science, electronics, and programming. It is the perfect platform for children to learn coding and create their own projects because it is accessible and affordable.
Home automation: The Raspberry Pi is a good choice for projects involving home automation since it has GPIO (General Purpose Input/Output) connections that can connect to sensors, switches, and actuators. Lighting, home appliances, security systems, and other things can all be controlled by it.
Media Centre: By installing media player software like Kodi, the Raspberry Pi may be turned into a media centre. On their TVs or monitors, users can stream and play multimedia material thanks to this.
Internet of Things (IoT): The Raspberry Pi is a good choice for IoT applications due to its connectivity options, which include Ethernet, Wi-Fi, and Bluetooth. To gather, process, and send data from linked devices, it can serve as a central hub.
Robotics: The Raspberry Pi is a popular choice for creating robots and autonomous systems because of its compact form factor and GPIO connections. It has the ability to manage sensors, motors, and other elements needed for robotic applications.
prototype and Experimentation: The Raspberry Pi offers a platform for electronic, software, and hardware project prototype and experimentation. Because of its adaptability, customers can add more modules and increase its capabilities as necessary.
The Raspberry Pi community is thriving and active, and there is a sizable online collection of projects, guides, and support. The Raspberry Pi opens up a world of opportunities for exploration, education, and invention for users of all skill levels.
What is a DC Motor?
A direct current (DC) motor turns electrical energy into mechanical energy. It is powered by direct current and has two major components: a stator (stationary element) and a rotor (spinning part). Because of their simplicity and controllability, direct current motors are frequently utilized in robotics, automation, and a variety of other applications.
What is the L298N Motor Driver?
The L298N motor driver is an integrated circuit that connects a microcontroller, such as the Raspberry Pi, to a DC motor. It includes the circuitry required to control the motor’s speed and direction utilizing Pulse Width Modulation (PWM) signals. Because it can tolerate large currents and voltages, the L298N module is ideal for controlling small to medium-sized DC motors.

Components Required
To control a DC motor with the L298N module and Raspberry Pi, you will need the following components:
- Raspberry Pi (any model)
- L298N motor driver module
- DC motor
- Power supply (compatible with the motor’s voltage rating)
- Jumper wires
- Breadboard (optional, for easier connections)
Wiring Connections
Follow these steps to connect the Raspberry Pi and L298N module to the DC motor:
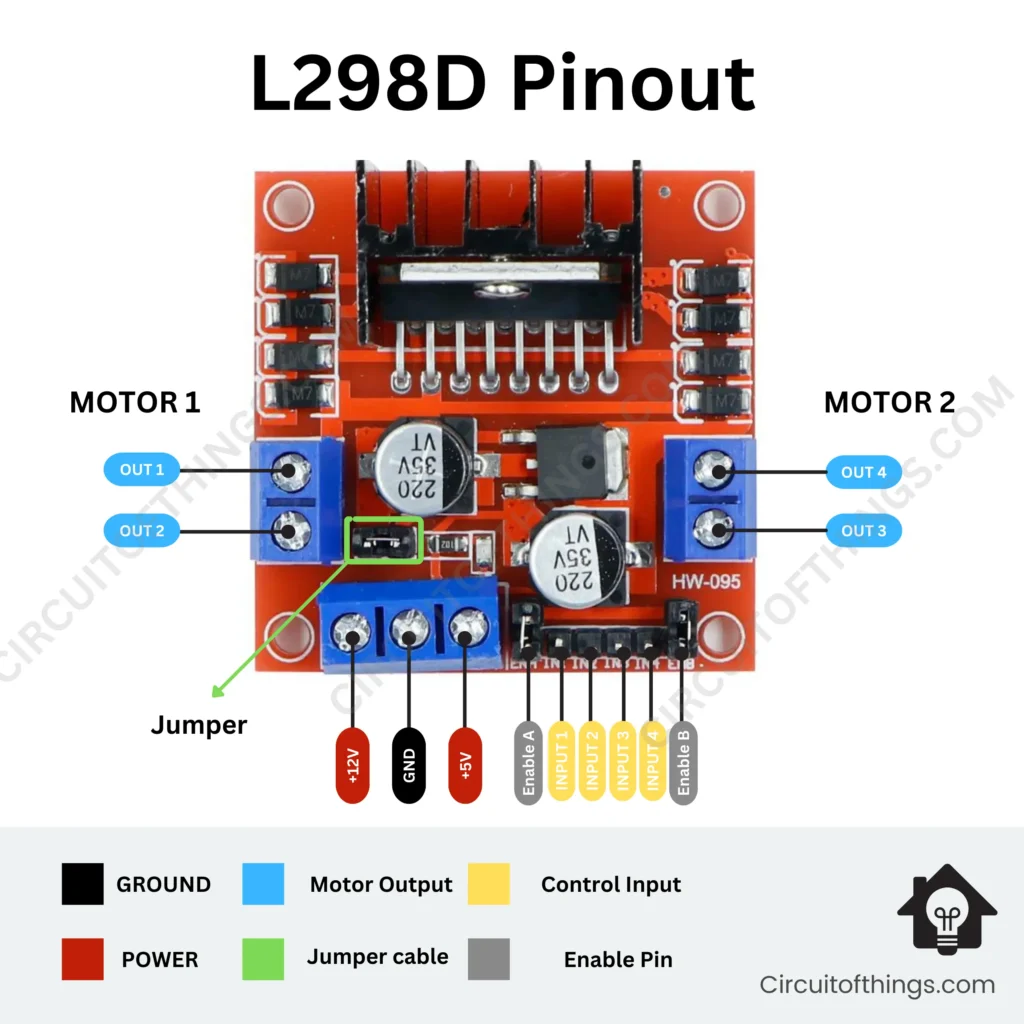
- Connect the Raspberry Pi’s 5V pin to the +5V terminal of the L298N module.
- Connect the Raspberry Pi’s GND pin to the L298N module’s GND terminal.
- Connect the Raspberry Pi’s GPIO pin 17 to the L298N module’s input 1 (IN1) terminal.
- Connect the Raspberry Pi’s GPIO pin 18 to the L298N module’s input 2 (IN2) terminal.
- Connect the Raspberry Pi’s GPIO pin 27 to the L298N module’s input 3 (IN3) terminal.
- Connect the Raspberry Pi’s GPIO pin 22 to the L298N module’s input 4 (IN4) terminal.
- Connect the motor terminals to the L298N module’s output terminals.
- Connect the power source to the L298N module, making sure the voltage satisfies the requirements of the motor.
- Connect the enable A (ENA) terminal of the L298N module to the Raspberry Pi’s GPIO pin 12.
- Connect the enable B (ENB) connector of the L298N module to the Raspberry Pi’s GPIO pin 13.
Before proceeding, ensure that all connections are secure and that the wiring is double-checked.
Installing the Required Libraries
Before we can use the Raspberry Pi to operate the motor, we must first install the appropriate libraries. To install the essential libraries, follow these steps:
Launch the terminal application on your Raspberry Pi.
Run the command sudo apt update to update the package list.
Run the command sudo apt install python3-rpi.gpio to install the RPi.GPIO library.
Now that we have the libraries installed, we can create the Python code to operate the motor.
Setting up Software
Ascertain that your Raspberry Pi is turned on and connected to the internet.
SSH into your Raspberry Pi or open a terminal.
Run the following commands to install the necessary software libraries:sudo apt-get update
Install Python 3 using sudo apt-get python3-dev python3-rpi.gpio
Make a new Python script, such as motor_control.py, and launch a text editor to edit it.
Writing the Python Code
Python and the RPi.GPIO module will be used to operate the DC motor on the Raspberry Pi. Here is an example of code that shows how to regulate the motor’s direction and speed:
import RPi.GPIO as GPIO
import time

# Set the GPIO mode
GPIO.setmode(GPIO.BOARD)

# Define the motor pins
IN1 = 11
IN2 = 13
ENA = 15

# Set the motor pins as output
GPIO.setup(IN1, GPIO.OUT)
GPIO.setup(IN2, GPIO.OUT)
GPIO.setup(ENA, GPIO.OUT)

# Create a PWM object for controlling the motor speed
pwm = GPIO.PWM(ENA, 1000)

# Start the PWM with a duty cycle of 50%
pwm.start(50)

# Set the motor direction (clockwise or counterclockwise)
GPIO.output(IN1, GPIO.HIGH)
GPIO.output(IN2, GPIO.LOW)

# Wait for 5 seconds
time.sleep(5)

# Stop the motor
GPIO.output(IN1, GPIO.LOW)
GPIO.output(IN2, GPIO.LOW)

# Cleanup the GPIO pins
GPIO.cleanup()
Testing the Motor
Execute the Python code after saving it to your Raspberry Pi. The L298N module’s linked motor should begin rotating in the appropriate direction and at the predetermined speed. Check your connections and code again for any issues if the motor doesn’t rotate as you would anticipate.
To create the appropriate motion, feel free to experiment with various motor speeds and directions.
Conclusion
In this post, we learned how to use a Raspberry Pi and the L298N motor driver module to operate a DC motor. We went over the necessary parts, and the wire connections, and gave a step-by-step tutorial for assembling and using the motor. You may develop a variety of projects including motor control and automation by utilizing the capabilities of the L298N module and the power of the Raspberry Pi.
To guarantee your safety when dealing with high voltages, keep in mind to be cautious and to always check your connections. It’s now time to explore the fascinating potential of motor control with the Raspberry Pi and let your creativity run wild!
Feel free to contact us if you need assistance

1 Comment
I want to to thank you for this fantastic read!!
I definitely loved every little bit of it.
I’ve got you saved as a favorite to look at new stuff you