Introduction
Get started with Arduino A Beginner’s Guide to the World of Electronics.
Are you fascinated by the world of electronics and programming? Are you looking for a hands-on way to explore your creativity and build innovative projects? Look no further than Arduino! In this comprehensive guide, we will take you through the exciting journey of getting started with Arduino. Whether you’re a beginner or have some experience with electronics, this article will provide you with all the necessary information to kickstart your Arduino adventure.
What is Arduino?
Before we dive into the nitty-gritty details, let’s start by understanding what Arduino is. Arduino is an open-source electronics platform that consists of both hardware and software components. It provides a simple and accessible way for anyone to create interactive projects by combining sensors, actuators, and microcontrollers.
Arduino boards are the heart of the platform. They are small, programmable circuit boards that act as the brain of your projects. These boards are equipped with various input and output pins, allowing you to connect a wide range of electronic components. With Arduino, you can build anything from a temperature-sensing device to a robotic arm!
Now that we have a basic understanding of Arduino, let’s explore how you can get started on your Arduino journey.
Get Started with Arduino: Step-by-Step Guide
1. Choosing the Right Arduino Board
The first step in getting started with Arduino is selecting the right board for your project. Arduino offers a variety of boards, each with its own unique features and capabilities. Some popular options include:
- Arduino Uno: The Arduino Uno is the most common board and is ideal for beginners. It offers a good balance of features, simplicity, and affordability.
- Arduino Mega: If you’re working on a project that requires a large number of input and output pins, the Arduino Mega might be the right choice for you. It has more pins and memory compared to the Uno.
- Arduino Nano: The Arduino Nano is a compact board that is perfect for projects with space constraints. It offers similar functionality to the Uno but in a smaller form factor.
Once you’ve chosen the board that suits your needs, it’s time to set it up and start programming!
2. Setting Up the Arduino Software
To program your Arduino board, you’ll need to download and install the Arduino Software (IDE). The IDE is a development environment that allows you to write, compile, and upload code to your Arduino board.
To install the Arduino Software, follow these steps:
- Visit the Arduino website and download the latest version of the IDE for your operating system.
- Once the download is complete, open the installer and follow the on-screen instructions to install the software.
- After the installation is complete, launch the Arduino IDE.
Congratulations! You have now set up the Arduino software on your computer.
3. Writing Your First Arduino Sketch
In Arduino lingo, a program is called a “sketch.” A sketch is a set of instructions that tells the Arduino board what to do. Let’s write a simple sketch to get started.
- Connect your Arduino board to your computer using a USB cable.
- Launch the Arduino IDE and click on File > Examples > 01.Basics > Blink. This will open a pre-written example sketch.
- Take a moment to understand the code. The Blink sketch turns an LED on and off at regular intervals.
- Make sure you have selected the correct board and port. You can do this by navigating to Tools > Board and selecting your board model, and then selecting the appropriate port under Tools > Port.
- Click on the Upload button (the right-pointing arrow) to compile and upload the sketch to your Arduino board.
If everything goes smoothly, the built-in LED on your Arduino board will start blinking! You have successfully written and uploaded your first Arduino sketch.
4. Exploring Arduino Libraries
One of the great advantages of Arduino is its vast library ecosystem. Arduino libraries are pre-written code modules that simplify complex tasks and allow you to easily interface with various sensors, displays, and other components.
To use a library in your sketch, follow these steps:
- Open the Arduino IDE and click on Sketch > Include Library > Manage Libraries.
- The Library Manager window will open, showing a list of available libraries. You can search for specific libraries using the search bar.
- Select the library you want to install by clicking on it, then click on the Install button.
- Once the installation is complete, you can include the library in your sketch by navigating to Sketch > Include Library and selecting the library you just installed.
Arduino libraries provide a wide range of functionality, from controlling motors to reading environmental data. By leveraging these libraries, you can accelerate your project development and focus on the creative aspects.
5. Building Your First Arduino Project
Now that you have the basics down, it’s time to embark on your first Arduino project. The possibilities are endless, but let’s start with a simple project to get you going: a temperature and humidity monitor.
Materials Required:
- Arduino board (such as Arduino Uno)
- DHT11 temperature and humidity sensor
- Breadboard
- Jumper wires
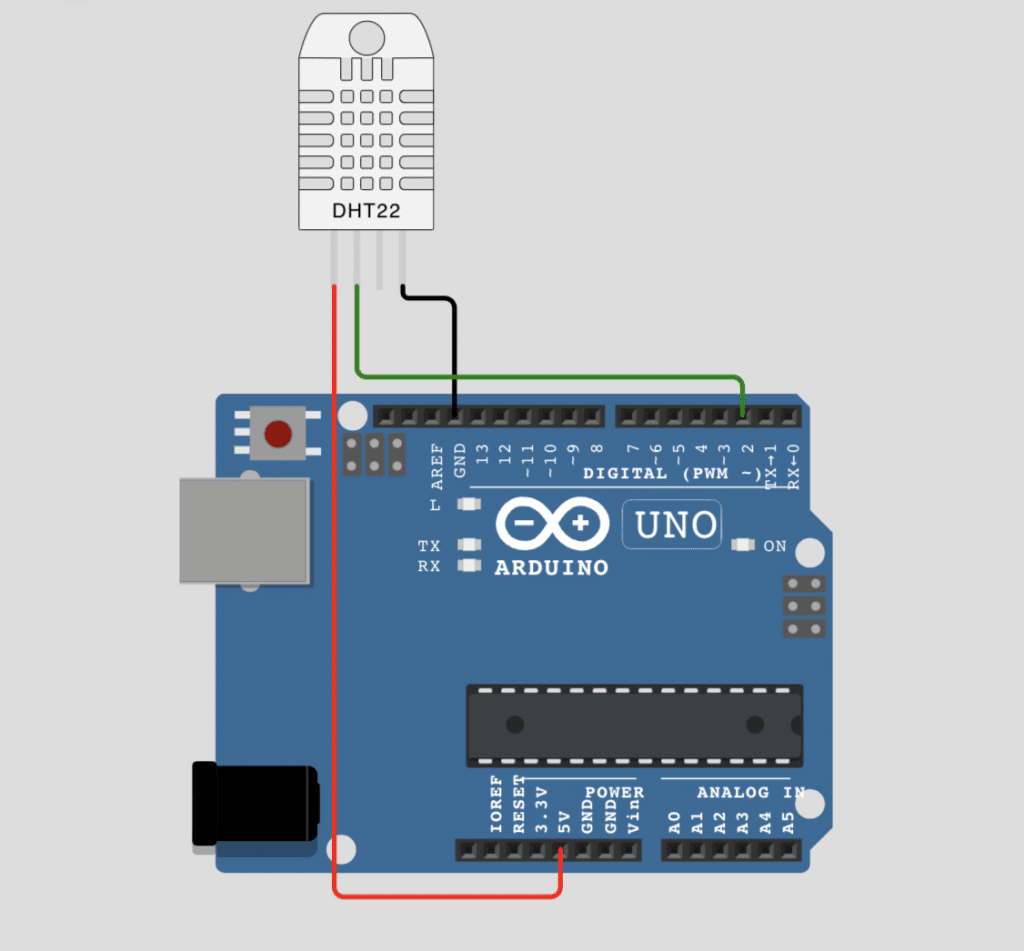
Circuit Setup:
- Connect the VCC pin of the DHT11 sensor to the 5V pin on the Arduino board.
- Connect the GND pin of the DHT11 sensor to the GND pin on the Arduino board.
- Connect the signal pin of the DHT11 sensor to digital pin 2 on the Arduino board.

Writing the Code:
- Open the Arduino IDE and create a new sketch.
- In the sketch, include the DHT library by adding the following line at the top:
#include <DHT.h> - Define the pin to which the DHT11 sensor is connected:
#define DHT_PIN 2 - Create a DHT object:
DHT dht(DHT_PIN, DHT11); - In the
setup()function,set the baud rate for serial data communication& Initialize the DHT11 sensor: Serial.begin(9600);dht.begin(); - In the
loop()function read the temperature and humidity values and display them on the Serial Monitor:
void loop() {
  float temperature = dht.readTemperature();
  float humidity = dht.readHumidity();
// Wait a few seconds between measurements.
  delay(2000);
  Serial.print("Temperature: ");
  Serial.print(temperature);
  Serial.print(" °C, Humidity: ");
  Serial.print(humidity);
  Serial.println(" %");

delay(2000);
}- Upload the sketch to your Arduino board and open the Serial Monitor to view the temperature and humidity readings
- When launching the Serial Monitor, a window opens where the serial data can be sent to the connected serial device. This is also where the received serial data from the device can be viewed. The baud rate and encoding can be set from this window.. (ex:- 9600 baud
Final Sketch Arduino UNO & DHT11:
// Testing sketch for various DHT humidity/temperature sensors
// Written by koyyala sai preetham
// for sketch search (WWW.circuitofthings.com) (https://circuitofthings.com/)
// REQUIRES the following Arduino libraries:
// - DHT Sensor Library: https://github.com/adafruit/DHT-sensor-library
// - Adafruit Unified Sensor Lib: https://github.com/adafruit/Adafruit_Sensor

//  Sketch Starts from here
// Symbol "//"Denotes Uncomment line cannot be excuted
// Main Code start from here

#include "DHT.h" //Includes Digital Humidity Temperature sensor(DHT) libraries

#define DHTPIN 2     // Digital pin connected to the DHT sensor

// Pin 15 can work but DHT must be disconnected during program upload.
// Uncomment whatever type you're using!
#define DHTTYPE DHT11   //  Now we are Using DHT 11
//#define DHTTYPE DHT22   // DHT 22  (AM2302), AM2321
//#define DHTTYPE DHT21   // DHT 21 (AM2301)

// Connect pin 1 (on the left) of the sensor to +5V

// Connect pin 2 of the sensor to whatever your DHTPIN is
// Connect pin 3 (on the right) of the sensor to GROUND (if your sensor has 3 pins)
// Connect pin 4 (on the right) of the sensor to GROUND and leave the pin 3 EMPTY
//(if your sensor has 4 pins)
// for 4 pin dht Connect a 10K resistor from pin 2 (data) to pin 1 (power) of the sensor
// Initialize DHT sensor.
// as the current DHT reading algorithm adjusts itself to work on faster procs.

DHT dht(DHTPIN, DHTTYPE);

void setup() {
  Serial.begin(9600);
  dht.begin();
}

void loop() {
  delay(2000);
// Reading temperature or humidity takes about 250 milliseconds !

  float temperature = dht.readTemperature();
  float humidity = dht.readHumidity();

  delay(2000);// Wait a few seconds between measurements.
  Serial.print("Temperature: ");
  Serial.print(temperature);
  Serial.print(" °C, Humidity: ");
  Serial.print(humidity);
  Serial.println(" %");

delay(2000);
}
//code ends
For Downloading DHT Sensor Libraries Click on below Link
🔗library https://reference.arduino.cc/reference/en/libraries/dht-sensor-library/
By following these steps, you have successfully built your first Arduino project! You can now extend this project by adding a display to visualize the readings or even integrate it with other devices using communication protocols like Bluetooth or Wi-Fi.
Frequently Asked Questions (FAQs)
Arduino uses its own programming language, which is a simplified version of C++. The Arduino IDE provides a user-friendly interface for writing and uploading code to the Arduino board.
Yes, Arduino is designed to be beginner-friendly. While some programming knowledge can be helpful, Arduino’s vast community and extensive documentation make it accessible to newcomers. With a willingness to learn and experiment, you can start creating projects without prior programming experience.
There are numerous resources available to learn more about Arduino. You can explore online tutorials, join Arduino forums, read books dedicated to Arduino, or participate in workshops and classes. Additionally, the Arduino website (arduino.cc) offers an abundance of documentation and project examples to help you on your learning journey.
Yes, Arduino can be used for both personal and professional projects. While Arduino boards are often associated with hobbyist projects, they can also be utilized in commercial applications. Arduino’s versatility and cost-effectiveness make it an attractive choice for prototyping and small-scale production.
Arduino has its limitations, mainly in terms of processing power and memory compared to more advanced microcontrollers. If your project requires complex computations or demands high-speed processing, you might need to consider using more powerful platforms. However, for most beginner and intermediate-level projects, Arduino provides more than enough capabilities.
Arduino boards and components can be purchased from various sources, both online and offline. Some popular online platforms include Arduino’s official store, as well as e-commerce websites like KSP Electronics, Amazon, Adafruit, and SparkFun. Local electronics stores and hobby shops may also carry Arduino products.
Conclusion
Congratulations on completing this comprehensive guide to getting started with Arduino! We have covered the basics of Arduino, including choosing the right board, setting up the software, writing sketches, exploring libraries, and building your first project. Remember, Arduino is all about hands-on learning and experimentation, so don’t be afraid to dive in and explore the endless possibilities.
Arduino provides a fantastic platform for both beginners and experienced enthusiasts to bring their ideas to life. So, gather your creativity, grab an Arduino board, and start creating amazing projects today! Feel free to contact us if you need assistance

1 Comment
I was pretty pleased to uncover this website. I wanted to thank you for ones time for this wonderful read!! I definitely savored every part of it and I have you saved as a favorite to see new information on your site.